Wednesday 25 May 2016

On building aircraft runway sections

Over the years I tried many different methods to replicate WW2 style concrete runways, including:

- Fine grit (400 or 600) black sandpaper glued on a flat board, with pastel chalk powder applied with a brush. That worked fine, but over the years, I noticed that the sandpaper had a tendency to lift and/or produce some wrinkles.
- Fine sand/chalk/plaster/pepper (yes, ground pepper) sprinkled over a light coat of white glue
- Plaster tiles

All these methods worked more or less well, until I found a miracle product called Superwand DS. It's basically an insulation material that bears a strong ressemblance to foamboard (those white sheets of plastic foam sandwiched between to sheets of thick white paper you can find in almost every art and craftstore on the planet). But unlike foamboard, Superwand DS has the following properties:

- It's MUCH easier to peel of the paper sheet
- It takes paint (especially water based) much better than foamboard, and its core material really look like miniature concrete. Plus it's a nice shade of medium/dark gray.

Here is what it looks like:


 So 1st thing to do is to peel off the sheet of paper. It's WAY easier to do than on foamboard (at least the various brands I've been using... no need to use a hot iron here, protective gloves and profanity)

Next, scribe some lines to represent the expansion gaps


 Once done, the gaps are a bit rough though, perhaps I was a bit heavy handed there...


 Anyway nothing that some putty will not cure. I use a water-soluble brand designed for "exterior repairs" (Never quite understood why it its for "exterior repairs only", especially since the one for "interior repairs" is solvent based... I can only assume the fellows who developed this brand experienced some heavy interior rain and a prolonged period of drought outside)


Now gently apply some on your board and spread it to fill the gaps.


Next use a (preferably) old, slightly wet, t-shirt to remove any excess putty, especially on the panels. You don't want to have "smooth" panels there.

And here's the final product


Some light tan grayish colour, some dark gray/black for the tar seams, and you're done!

Here are some examples of completed runways using Superwand DS.


(Yes, I find the tar lines a bit oversized, but I didn't feel like redoing them)

One final word: Superwand DS is a bit more expensive than foamboard, granted, but I find the foam much more pleasant to work with than the latter. Plus it's also great for walls and buildings, IMHO better than foamboard. The drawback is that is only comes in 1cm and 2 cm thicknesses, which might prove impractical for small scale buildings.

Where can you find the stuff? Well, in my case, I'm lucky enough to live 30 m away from a industrial paint supplier/art store outlet (Jallut SA, a rather well known company in Switzerland). Otherwise I believe that it would be possible to directly order from the manufacturer, although that would probably mean having to order enough panels for a full scale B17:
https://www.korff.ch/en/enhome/

Alternatively, you might want to check construction sites/ flats being refitted... There's often interesting stuff that can be found in the trash and leftover materials.... I believe there must be some similar stuff available for free.


Happy Modelling!

Treflon

Monday 16 May 2016

On modelling a WW2 japanese carrier deck section - part 2

Hello again friend (s?),

Here 's the second and final part. I have a confession to make: my attempt at replicating the middle section of the tie-downs did not go as well as expected. First I was a bit heavy-handed with the application of liquid cement, so most of the sprue either dissolved or did not level up with the deck. I should have probably scribed a tiny grove first, THEN glue the sprue in it, in order to bring it to a satisfactory height. Mmmh, I'm not making much sense here, please take a look at the picture...

Ah yeah, right, I didn't take any, since I didn't feel going through the whole exercise again. Anyway, I ended up reworking my tie-downs from the top, by gluing tiny bits of sprue in the holes. At least the previously glued sprue provided some kind of support to the tiny bas..ards... Surprisingly, it did not take me much than 30 minutes to complete that chore. Here's the final product, with tie-down painted black, higlighted with medium gray, and a generous wash of burnt umber oil paint.


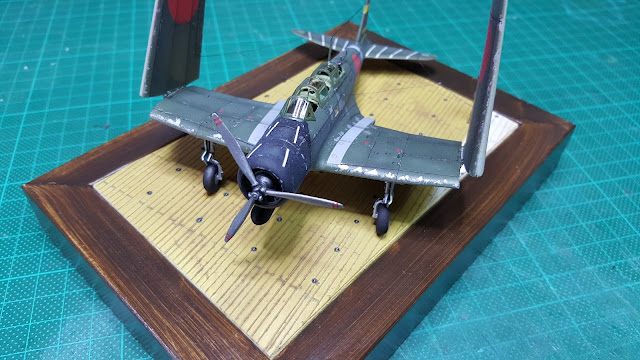
 And to provide some "context" to the base, I found it useful to put a model in it, in this case Airfix's nice 1:72 Nakajima "Kate" model.

Yes, I know that purists will argue that the wings fold all the way to the cockpit, not just halfway through as depicted. The reasons I glued them that way are:
1) Mr Airfix has provided microscopic attachment points, and I found it almost impossible to get a solid bonding. Plus, I forgot to place the support masts Airfix provided... So if you build it, don't be an idiot when you can watch one at work on this very page.
2) I spent quite some time detailing the cockpit and wanted to be able to display my work.... (Poppycock: I used Eduard's zoom photo etched set, that went on in approximatively 30 minutes... Thanks Mr Eduard!)

In case you wonder, the little fellow who appears to have stomach cramps is a (rather ugly) Preiser German WW2 pilot with the head of one of the pilots Airfix provides with the kit.

Here are some more photos:


So that's it, I hope you enjoyed reading this post as much as I enjoyed... playing Uncharted IV.

Happy Modelling!

Treflon
Saturday 14 May 2016

On modelling a WW2 japanese carrier deck section


In this post I'll describe my attempt at building a section of a WW2 Japanese carrier deck. Of course, there is a number of commercial products available, but for the most part, they fail to capture the "3D" looks of tie-downs. Moreover, they're not cheap and/or hard to find.

The picture below shows what you will need:


- Sheet of styrene (I used 0.5mm thick, but in hindsight, I would recommend using 1mm for reasons I'll explain later)
- A metal ruler
- A scribing tool ( I use a compass needle in a pin wise)
- A circle scribing template of 2mm diameter
- A 1mm hand drill (the punch and die set you can see in the picture, although it makes cleaner holes, is hard to use in the middle of the sheet...)
- A fine felt-tip pen
- Some reference (in my case an Eduard photo etched sheet depicting a section of the Akagi carrier deck. Sure I could have used that, but, although it is very nicely made, I found the tie downs didn't look like much. Plus it is not very "generous" in its dimensions)
- Some soothing background music

Ok, let's get started. 1st order of business is to cut a rectangular piece of styrene the size you want. Now you're going to mark with the pen parallel lines 2cm apart ( don't get fooled by the picture, I made a mistake and used 2.2 mm...). On these "tie-down lines" trace a dot every 1.4 cm. These will be the centres of the tie-downs.

Now drill a 1mm hole in each dot

Around each hole, carefully scribe a 2mm circle

Once this is done. it's time to draw the planks. The Eduard sheet shows 2mm wide planks in 1/72, and there are 10 between each "tie-down" line.


Now it's time to carefully scribe the planks. Note that on the "tie-down lines", the line should stop at the edge of each tie-down.

(This is were the soothing music comes into play, you can't afford a mistake here...)

Once done, you will notice that
1) You are 2 hours older
2) Your back is hurting
3) You wonder if you shouldn't have used that photo etched sheet after all
4) and finally the plastic sheet has a distinct curvature due to the heavy scribing. This is why it would have been better to use a thicker sheet. Anyway, nothing that cannot be fixed by a strong adhesive or a dip in boiling water...

It's time to clean the sheet with fine steel wool (which is better than sandpaper as it does not clog the lines as much as sandpaper would), and mark the vertical separations of planks. According to the Eduard sheet, the planks should be 4 cm long in 1/72, and offset by 2cm on each subsequent row (I myself have trouble understanding what I just wrote, so please check the pictures)

Once you're done, it's a good idea to wash the sheet with rubbing alcohol, both to remove dust and erase the pen marks (I have noticed that pen ink has a tendency to "turn" over the years if applied under a coat of paint)


The final step is to flip the sheet over, and glue some stretched sprue across the holes, using liquid cement. These will represent the centre section of the tie-downs.

While the sprue is still soft (due to the action of the liquid cement), you may want to lightly "push" it up so it more or less levels with the rest.


After the glue has set, you can finally glue the sheet to your base. Et VOILA!

Here is what it looks like after a first coat of Tamiya dark yellow.


I'll show you the final version in a future post, but right now I feel a strong urge to return to important matters. Namely continue playing Uncharted IV....

Happy Modelling!

Treflon