Friday, 18 November 2016

Some sauted squid

Hello again (virtual) reader,

As mentioned in my profile, I do have a particular interest in roasted squid, so here is one way of cooking it. Technically, we're talking about "sauté" squid rather than "roasted", but hell, who cares? (not to mention WHO's reading this?....)

You will need:
- Squid
- Chopped onions
- White wine
- tomatoes
- Green peas ( I use some frozen variety rather than a canned one, never really liked the canned ones. Don't ask...)
- some parsley, herbs, salt, pepper, tabasco....
- some olive oil

- Rinse the squids under tap water, and separate the "tentacles" from the body (this is optional, I just like to have a variety of shapes on my plate)
- In a pan, heat the oil and gently fry the onions, add the squids. It's preferable to have a really hot pan in order to give the squids a nice colour. After a minute or so, turn the heat down to medium
- Let the squid give out it's water, let the mix gently simmer until there is almost no liquid left.


- Add some green peas, white wine, chopped tomatoes. Let the mix simmer again for approx 10-12 minutes. Meanwhile add some salt, pepper, herbs, tabasco sauce....
- Turn off the heat, and add some freshly cut parsley.

Et voilà! Serve with rice, or whatever else you please. Bon appétit!


Treflon

Tuesday, 15 November 2016

Making tiny leaves

Hello again,

I saw this neat article by the super talented Mr. Calvin Tan, about making leaves http://zyclyon.blogspot.ch/2007/10/yeah-right.html  and thought the idea was absolutely brilliant. So after spending the equivalent of the foreign debt of Mexico on Eduard photoetched leaves and a bottle of Fimo Deco Gel, I decided to have a go.

Here's a picture of various sets partially covered in a mixture of Fimo Deco Gel and oil paint.


2 points worth mentioning:
- It is vital to use artists' oil (I guess enamel based would do as well) to colour the gel, using acrylics just turns it into a chewy mess
- Take extra care to apply the mixture carefully, without any of it flowing "under" or "between" the leaves. I was careless and ended up spending an insane amount of time just cleaning the 2 photoeched sheets (the ones on the right in the picture), because the mix had somewhat "encased" it in an rubbery shell.

Once this is done, I just stick the whole thing in the oven according to the Fimo instructions. (Roughly 15 mins at 120 degrees Centigrade, or something like that...). Then with a small blade, gently lift each leaf, one by one.

Here are a few leaves attached to a small piece of "zeeschuim",aka "Teloxys Aristata", a kind of shrub-like plant that seems to exist only to be used in scale modelling.... Prior to attaching the leaves, it has been given a quick coat of matt black.


And here's another one, with differently coloured leaves

And, as usual, to put things in context, here are some views of the final scene.


Happy Modelling!

Treflon


Wednesday, 10 August 2016

Painting a 1:72 pilot figure, my quick and dirty way

Hello fellow plastic worshipper(s?),

In this post, I'm going to briefly describe one "method" (I dare not call it a "technique"...) to paint small scale figures. I usually take this approach in the following scenario: it's 3 PM on a Sunday afternoon, you just completed a model and would like to add a human element, in the form of a single pilot or groundcrew figure standing next to it. But without spending too much time ( I know that modellers are supposed to be patient and take their time and all, but we're only humans - albeit "weird" ones - and do get impatient too...).

Before I start, let me briefly state that:
- I do not consider at all the final result to be any good, but quick.
- It'a 1:72 figure, so it's tiny

The figure I picked for this post is a 1:72 white metal offering from Gunthwaite Miniatures, that offers a nice range of Royal Navy and Fleet Air Arm figures, most of them can easily pass for RAF or even other nations.

Here is the figure primed with a light airbrush coat of Tamiya Sand Yellow ( the pinkish blob on the left is my finger)

First is the flesh base, made with a mixture of Vallejo Brown Sand 876 and a dash of 946 Dark Red
Next a few higlights, above the cheeks, below the eyes, on the nose, chin and upper lip. I used the base colour lightened with Vallejo "1st light colour" from their flesh painting set.

Next the eyes. Since it's 1:72, a simple dash of black will do. Unless you're painting a wide-eyed alien, there's no need to paint the white.

Next are some shadows, on the sides of the nose, under the lower lip and chin. There is also a shadow lining all around the face where it meets the helmet. The colour used is base flesh + 2nd shadow from the Vallejo paint set ( I still need to figure out what good is their 1st shadow colour, never been able to use it for anything). I also put a very diluted veil of 945 Magenta on the cheeks to "liven up" the face.


Next step, although optional, is to add a little "sparkle" to the eyes. I just used a micro dot of Vallejo 918 Ivory, which is far more covering than any other white paint I ever used. Note that the dot has been put in the center of the eye, not the sides. (Sorry for the blurry picture here...)


Now the uniform. I used a mix of Medium Blue 963 and Dark Sea Blue 898, with a drop of Tamiya flat base, to kill the shine inherent to Vallejo's dark blue paints.

The life preserver gets a coat of Japanese Uniform 923, which is much more covering and less "toyish" than a normal yellow paint. Now why on earth is this called "Japanese uniform", I don't know. Any trooper wearing such a colour would be spotted from the moon...


Boots and helmet receive a coat of 862 Black Grey and 822 Cammo Brown respectively.

Uniform gets some shadows by using the base coat with more Dark Sea Blue added.
Next some highlights to the uniform, by adding 961 Sky Blue to the mix. Note that the contrasts are quite harsh, and that no blending whatsoever has been attempted. (I heard once a guy in a figure contest saying : "When it comes to dark blue uniforms, trying to highlight them up a bit invariably ends up in highlighting them up a lot. No truer words have ever been spoken...). I also highlighed the edges of the lower part of the coat, which is of course unrealistic, but gives the figure slightly more "oomph" when watched from a distance. Moreover, those harsh contrasts will be subdued later.


Next the life preserver gets some highlights and shadows. For highlights, try light yellow or Ivory, whereas for shadows, nothing beats Violet when it comes to darken yellow.


The helmet receives highlights made by mixing Cammo Brown with Orange. Here again the contrasts are quite harsh.

Now strategically placed finishing "touches of light" are added. These are the buttons, the bootstraps (Ivory) and the goggles (gloss black)
At this stage, I cannot resist showing you my wet palette, because I'm fed up of seeing my own finger...

Ok so now comes the finishing part, the one that will take care of the harsh contrasts we have so far and blend everything in.

The idea is to used controlled washes with oïl paint. Actually, rather than "washes" as we know them, it's more something I like to call "wet-brushing". Think of "drybrushing" but with heavily diluted paint instead.

Here is the palette I used. A mixture of Dark blue and Black will be used for the uniform, Van Dyck Brown and Sepia for the vest and helmet.
To summarize, these "controlled" oïl washes will provide 2 benefits:
- The harsh contrasts created by the highlights will be somewhat "blended"
- Darkest shadows will be further enhanced

Here is the final result. Surely, I could have done MUCH better, but for a one-hour painting session, it's not too bad, right?


And here is the figure in context, standing next to Airfix's 1:72 Blenheim Mk IV F
Happy Modelling

Treflon

Wednesday, 20 July 2016

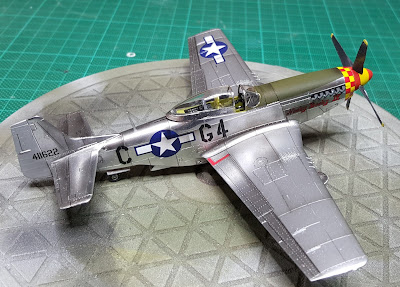
Tamiya 1:72 Mustang - Adventures in Alcladland

Hello again,

Almost completed Tamiya little jewel of a kit. I used Alclad II chrome, aluminium, dark aluminium and finally burnt iron lightly sprayed along the panel lines to provide some contrasts. As recommended by Alclad's instructions, I used a gloss enamel black as a primer, polished with Micromesh to a "glass-like" finish, and sprayed the entire model with Chrome. The result is shiny, very shiny, in fact WAY too shiny for an operational machine. But in the end I decided I actually liked it and could live with it. And it reminded me of that quote in "My name is Nobody": "You shine like the door of a whorehouse. A blind man could spot you ten miles off"


Here's the pictures:


One final word of advice: On their website, the good folks at Alclad's recommend you wrap the bottle in a rag or something before shaking it. In case the tiny metallic ball tries something funny, like escaping its surroundings. I can only say one thing: DO IT! You don't want to end up owning curtains that look like they have been customized by Jackson Pollock....


Happy Modelling!

Treflon


Airfix's new 1:72 C47 Skytrain

Hello there,

No particular technique involved here, just a model and a few figures. This is Airfix 's 1:72 offering, a neat (not so little by the way, never realized a C47 had the same wingspan as a B17...) model.

I had in mind depicting the plane that carried Lt. Dick Winters on D-Day, so I purchased some clear and white decal sheet to print my own decals. I learned a few lessons:

1) Making your own decals takes a lot of planning, be prepared to ruin several decal sheets

2) Printing yellow is virtually impossible, so I finally used some leftover serial numbers from an Italeri kit. Granted, the model is not accurate, but who really checks the serial numbers anyway?

3) The font for US WW2 serial numbers is called "AmarilloUSAF" and finding it for free online is a bit like looking for the Holy Grail. I wish I could tell you how I got hold of it, but the sad truth is that I simply cannot remember. What I do remember is visiting an insane number of very suspicious websites selling it for stupidly high prices. (Said websites would also offer penis extenders and tiny blue pills. Not much modelling use there....).

So here are the pictures. The figures are a mix of Italeri 1:72 US paras (soft plastic), hard plastic Italeri's (There is a figure in the Horsa and Waco gliders models) and good old Airfix USAAF personnel. The jeep is the new Airfix model.


Happy Modelling!

Treflon

Wednesday, 13 July 2016

The Klear (or Klir) vs Future debate....

Hello,

If you're reading this, there is a strong chance you're into scale modelling and heard about the magical fluid called "Future Floor Shine", a.k.a. "Pledge with Future Shine". I won't go into details, many have covered the subject before me, suffice to say that this miracle product is essentially an acrylic gloss varnish, with a distinct artificial apple scent, that has many applications in the hobby: gloss coat, restore the shine on clear parts, glue small photoeteched elements, and so forth....

Now if you've tried to find a bottle of the miracle stuff, you will have realized that it's been discontinued for a while, and that many modellers claim that the manufacturer just rebranded the stuff and gave it a slightly different formula. The new name is Johnson "Klear" (or "Klir" in French speaking countries) and it (allegedly) works the exact same wonders.

Now is that true? Let's find out.

I conducted a small experiment, testing 4 different products, namely:

- "Pledge with future shine", which is exactly the same as the former "Future Floor Polish". (I used to have a bottle of the "original" Future, which I bought back in 1995 - yes, I'm that old- and got the "pledge" one shortly before my "future" supply ran out. There was not the slightest difference between the 2)
- "Johnson Klir", claimed to perform exactly the same by many french-speaking modellers
- "Johnson Sols Plus", which some claim is a rebranding of Johnson Klir.
- "Pial", which is some sort of floor polish sold in Switzerland. Forget about this one, it has absolutely no modelling use.


As you can see, all products have a milky aspect, except "Pledge". Both "Klir" and "Sols plus" look and smell virtually the same, while "Pledge" retains that "artificial apple" scent that whoever used Future once will recall. As for "Pial", well, forget about it, and just use it as a floor polish.

First test conducted was to scratch pièces of clear styrene with 2000 grade sandpaper....


... and give them a dip:


So here it goes: as far as the "dipping" treatment is concerned, "Pledge with future shine" is vastly superior to the other 2. So is Klir/sols plus the "same"? No Sir....

Second test was to airbrush each product on prepainted parts. I sprayed Tamiya XF68 Brown, Tamiya XF 60 Dark Yellow and Italeri 4766AP Flat Non Specular Blue Gray on dark olive plastic parts.


Dark yellow turned dead flat, while the other 2 had already a slight sheen.

Next I sprayed each section with the corresponding product, and sprayed a 4th section with "normal" gloss acrylic varnish thinned with 50% rubbing alcohol.

On the dark yellow, here is what I got:

BEFORE

AFTER

Here again, "Pledge/Future" gives better results. Oddly enough, "Klir" and "Sols Plus" seem to behave differently, even though they really look like the same product straight from the bottle. Here "Sols Plus" gave a surprisingly good result, even slightly better than the "normal" gloss varnish. But for the latter, the use of rubbing alcohol as a thinner might have impaired its performances.

On a glossier initial coat (XF 68 dark Brown), here is what I got:

BEFORE


AFTER

Once again, the results are pretty much the same...

Finally with the Sea Blue-Gray

BEFORE

AFTER


Now it's hard to see any differences, except perhaps that "Klir" hasn't affected the original finish much, and that "Sols Plus" still behaves better.

Now I should mention the fact that "Sols Plus" is extremely thin and tends to "run" when sprayed, even at moderate pressures. I did not have this problem with "Future" and "normal" varnish.

Conclusion: "Klir" is DEFINITELY not the same as "Future" and "Sols Plus" might have some similar properties (but it's really a pain in the sphincter to spray properly). I wouldn' t recommend using any of these products besides their original use. I might even write a post about their cleaning properties in the future if I don't have anything better to do....

Happy Modelling

Treflon